Rooster Rivals Training Guide: Conditioning, Spur Bag and Fight Camp
Raise the conditioning bars that support your chicken's combat role, time active drills, and choose farm sessions that fit its stamina. Fight Camp opens a temporary ceiling above normal training.
Train at the Training Grounds to raise conditioning toward 100 for a +5% corresponding stat bonus. Each bird has five daily drills, with energy restored each night; continuing without energy carries a 12% Sore Leg risk. Friends training at the same station in different lanes earn 15% more learning for their first five drills together per partner each day. Individual Fight Camp opens a three-day window to train bars to 130 for +8%, while farm equipment trains conditioning up to 80.
Conditioning bonuses and decay
Open INSPECT > SUMMARY to read the conditioning bars beside your chicken's stats. These bonuses add to the stats established by genes and level.
| Conditioning bar | Combat stat | Main benefit |
|---|---|---|
| WIND | HP | Endurance, less fatigue |
| POWER | ATTACK | Stronger pecks and kicks |
| FOOTWORK | SPEED | Earlier actions, more dodges |
| TOUGHNESS | DEFENSE | Less damage per hit |
FOOTWORK is also shortened to FOOT or FOOTW; TOUGHNESS is shortened to TOUGH.
Neutral value, bonuses and upkeep
The normal bar range is 0–100. 50 is neutral, and newly hatched chicks start at 50. From 50 through 100, calculate the corresponding stat bonus as:
Bonus (%) = (conditioning − 50) × 0.1
For example, POWER 65 gives +1.5% ATTACK, and POWER 100 gives +5% ATTACK. Each bar affects its own stat independently.
Without a decay-reduction effect, bars above 50 lose 15 points per day toward 50. Decay stops at 50, so skipping training removes the extra bonus without pushing the bar below neutral. After a trade, the new owner needs to train the bird again.
Choose drills by your target: Endurance Loop raises WIND; Sprint Track raises WIND and FOOTWORK; Spur Bag raises POWER; Sway Perch raises TOUGHNESS; Peck Targets raises FOOTWORK. For the complete station and equipment reference, use the training directory.
Style Post raises a separate progression system. Follow Style Mastery and Underwing Duck for its controls.
Spur Bag timing
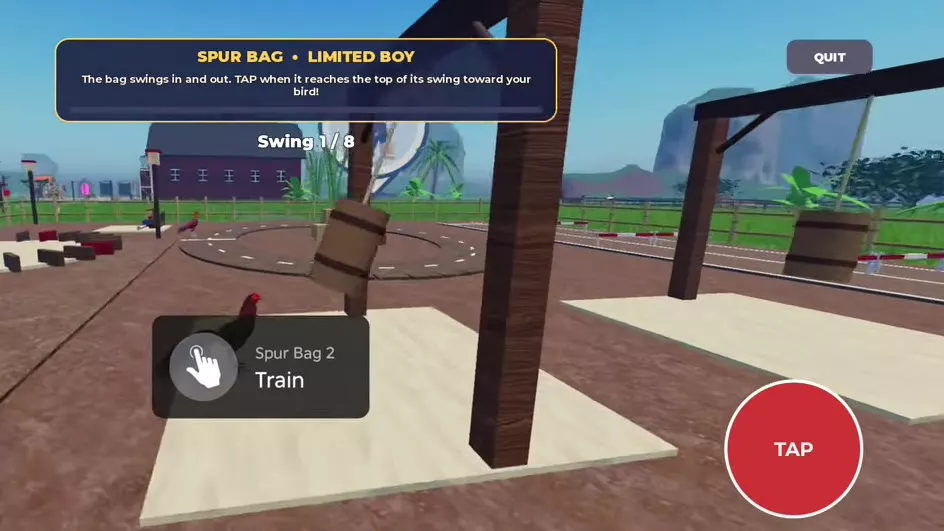
Spur Bag trains POWER, increasing the corresponding ATTACK bonus.
- Use the bag's Train interaction and select TRAIN beside your bird. Take the bird out of its cage first if the menu requests it.
- Wait for the countdown. Watch the bag swing toward your bird, then press TAP at the peak of that swing.
- Complete all eight swings. A PERFECT message after a tap grades that timing input; the final grade covers the whole drill.
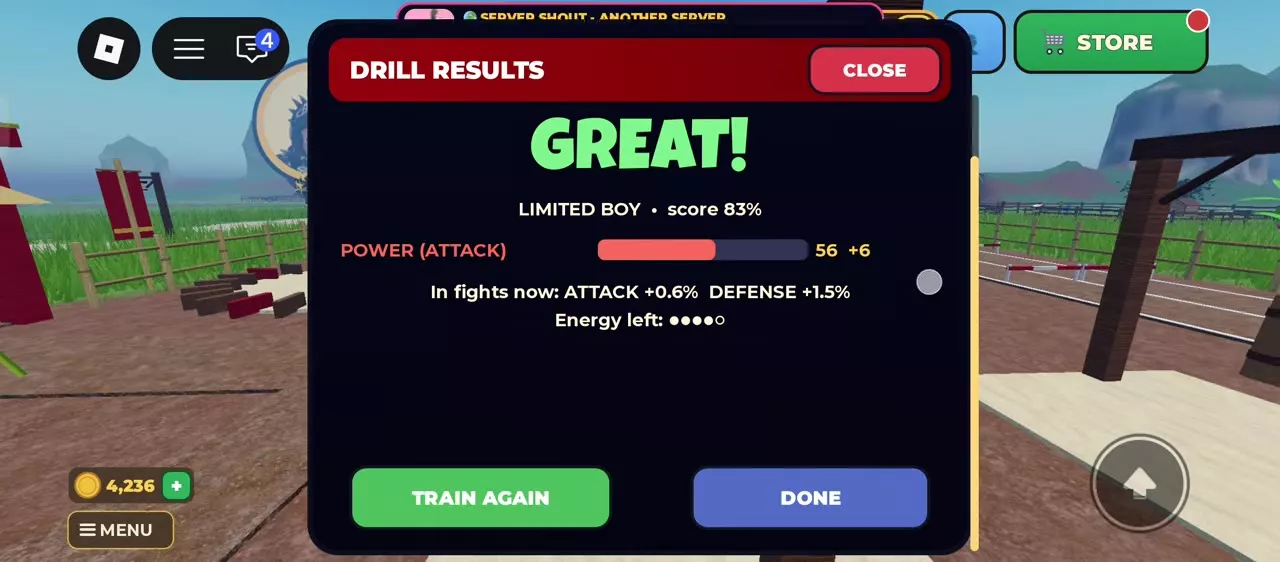
- Read DRILL RESULTS for the overall score, POWER gain, combat bonuses and remaining energy.
- Select TRAIN AGAIN to repeat or DONE to leave. Use QUIT to exit an active drill.
POWER gains from a starting value of 50
For LIMITED BOY, Level 16, Jumpy, the following consecutive results raised POWER from 50 to 98:
| Grade | Score | POWER gain | POWER after | ATTACK bonus |
|---|---|---|---|---|
| GREAT | 83% | +6 | 56 | +0.6% |
| PERFECT | 91% | +9 | 65 | +1.5% |
| PERFECT | 94% | +9 | 74 | +2.4% |
| PERFECT | 95% | +9 | 83 | +3.3% |
| GREAT | 85% | +6 | 89 | +3.9% |
| PERFECT | 93% | +9 | 98 | +4.8% |
Its TOUGHNESS stayed at 65, supplying a separate +1.5% DEFENSE throughout. Use your bird's remaining energy to decide when to stop; this six-result sequence is not a daily training allowance.
Training during Fight Camp
With Fight Camp active and no energy remaining, LIMITED BOY earned GREAT at 81%, gaining 6 POWER from 98 to 104 for +5.4% ATTACK. It also suffered a leg injury from overtraining. Opening the higher ceiling does not make an exhausted bird safe to train.
For LISTYOK, Level 15, Brave, with Fight Camp active, these solo results gave larger gains:
| Grade | Score | POWER gain | POWER after | ATTACK bonus |
|---|---|---|---|---|
| GREAT | 84% | +8 | 81 | +3.1% |
| GREAT | 85% | +8 | 97 | +4.7% |
| PERFECT | 100% | +12 | 109 | +5.9% |
| PERFECT | 98% | +12 | 121 | +7.1% |
LISTYOK's other current bonuses were +3.1% HP, +2.4% SPEED and +1.5% DEFENSE. The +8 and +12 gains belong to this bird's active setup; the standard grade rewards remain 6 for GREAT and 9 for PERFECT.
Partner drills and Spur Bag Duo
Train with a friend at the same station in different lanes to give both birds 15% more learning. The bonus applies to the first five drills with each partner per day.
Choose Sparring Pair for WIND, Spur Bag Duo for POWER, or Relay Sprint for WIND and FOOTWORK. For partner sparring at the ring, approach Pair Ring – with a partner and use Spar.
Start and complete Spur Bag Duo
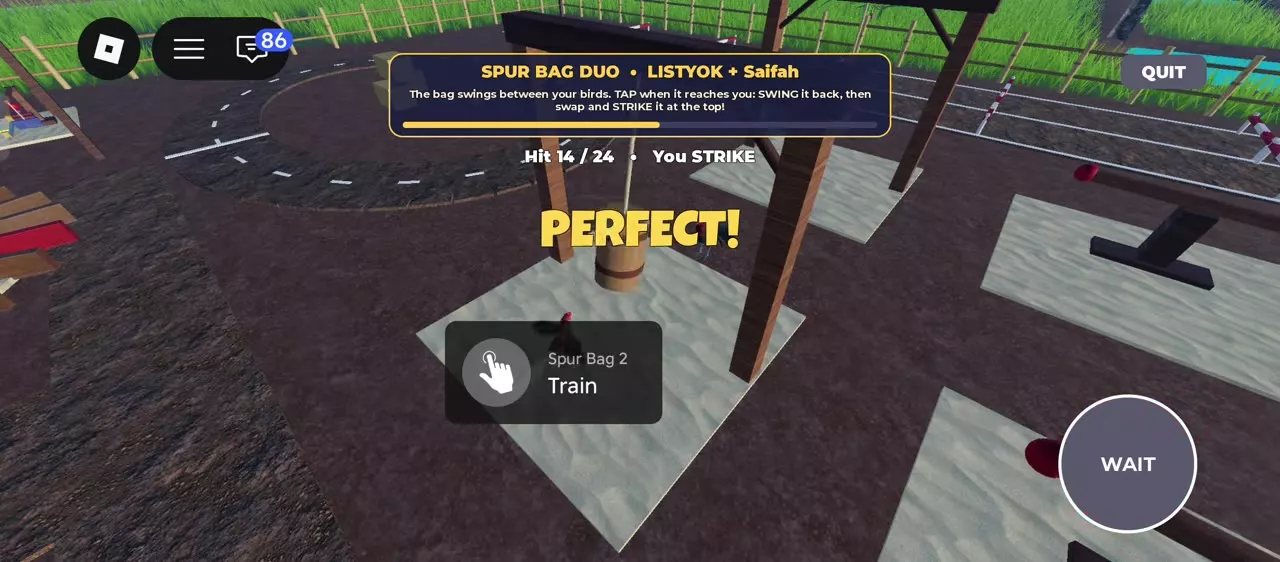
- Open a Spur Bag's bird menu and select WITH A PARTNER beside your bird.
- Have another player press JOIN at that Spur Bag. To use a substitute, select PRACTISE WITH KRU'S BIRD. Use CANCEL to leave the waiting screen.
- During SWING, tap when the bag reaches your bird to send it back.
- When roles switch to STRIKE, tap at the top of the swing. Do not tap while the control says WAIT.
- Complete the 24-count sequence, then read the separate strike and swing scores, overall grade and POWER gain. Use QUIT to leave an active drill.
Kru's bird lets you complete the partner drill without another player, but does not grant the friend bonus.
LISTYOK's partner results
For LISTYOK, Level 15, Brave, with Fight Camp active, a session with Kru's bird earned PERFECT with 100% strikes and 92% swings. It added 12 POWER, raising the bar from 61 to 73. The resulting bonuses were +3.1% HP, +2.3% ATTACK, +2.4% SPEED and +1.5% DEFENSE.
A later session with Kru's bird earned GREAT with 75% strikes and 97% swings. It added 8 POWER, raising the bar from 81 to 89, with three energy dots remaining. The bonuses were +3.1% HP, +3.9% ATTACK, +2.4% SPEED and +1.5% DEFENSE. These gains illustrate LISTYOK's setup, not a friend-bonus reward from the substitute.
Fight Camp
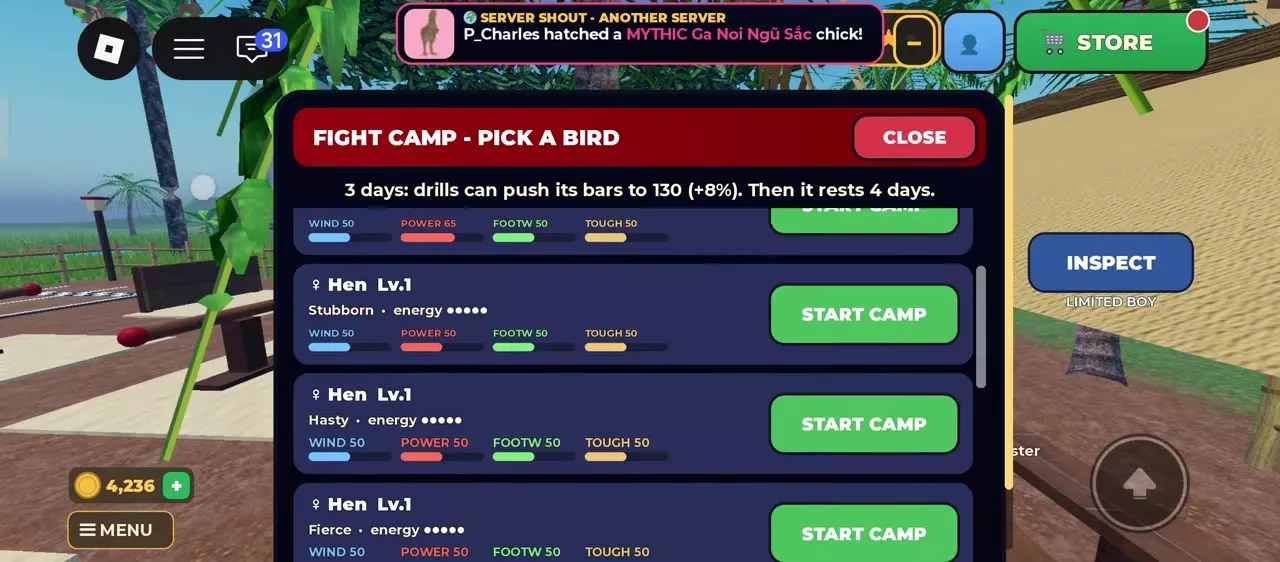
Individual Fight Camp lasts three days and lets training raise conditioning bars to 130, giving a +8% bonus to the corresponding stat at that value. Four days of rest follow the camp.
- Talk to Kru Somchai at the Training Grounds.
- Choose Fight camp, then Pick a bird.
- Select Start Camp for the bird you want to train.
- Train during its camp window. Check the bird's CAMP timer and the FIGHT CAMP: up to 130 label in drill menus and results.
- Schedule the bird's intended fights while its extra conditioning is active.
Starting camp opens the higher ceiling; it does not fill the bars. After camp ends, the extra conditioning fades quickly. Use camp when you can spend the training window building bonuses and then put those bonuses to work in fights. Continue to manage daily energy, because overtraining still causes Sore Leg.
Group Fight Camp
Group Fight Camp is a timed drill challenge that awards energy. The individual Fight Camp above opens a temporary conditioning ceiling.
- Gather 2–4 trainers and use JOIN on the Group Fight Camp board beside the trainer.
- Complete a combined total of 20 drills with an overall PERFECT grade within 30 minutes.
Completing the challenge gives one energy to every bird you own. Count completed PERFECT drills toward the target; an individual PERFECT tap during a drill is timing feedback.
Farm training sessions
Choose Circle Training Cage for slow automatic training, Running Wheel or Perch Jump Bar for TOUGHNESS and XP, and Sparring Dummy for POWER and XP. Farm equipment trains conditioning up to 80. Use Training Grounds drills to go higher.
Select a bird and start a session
- Open the equipment's Train interaction.
- Read the selected adult chicken's stamina, conditioning, WIND and daily progress.
- To change birds, press SELECT CHICKEN, choose an available adult and press PICK.
- Choose the session, check its displayed stamina cost, and press START TRAINING.
If the panel reports insufficient stamina, resting, Already training, or a completed daily round, let the bird rest or select another available bird. Stamina recovers while resting, and higher WIND reduces fatigue.
Circle Training Cage
The cage trains slowly and automatically, up to conditioning 80. Hens can use training cages to level up like roosters. Use TAKE OUT to remove a bird.
The Extra Training Cage pass permits a second Circle Training Cage, allowing four roosters to train at once across two cages.
Running Wheel and Perch Jump Bar
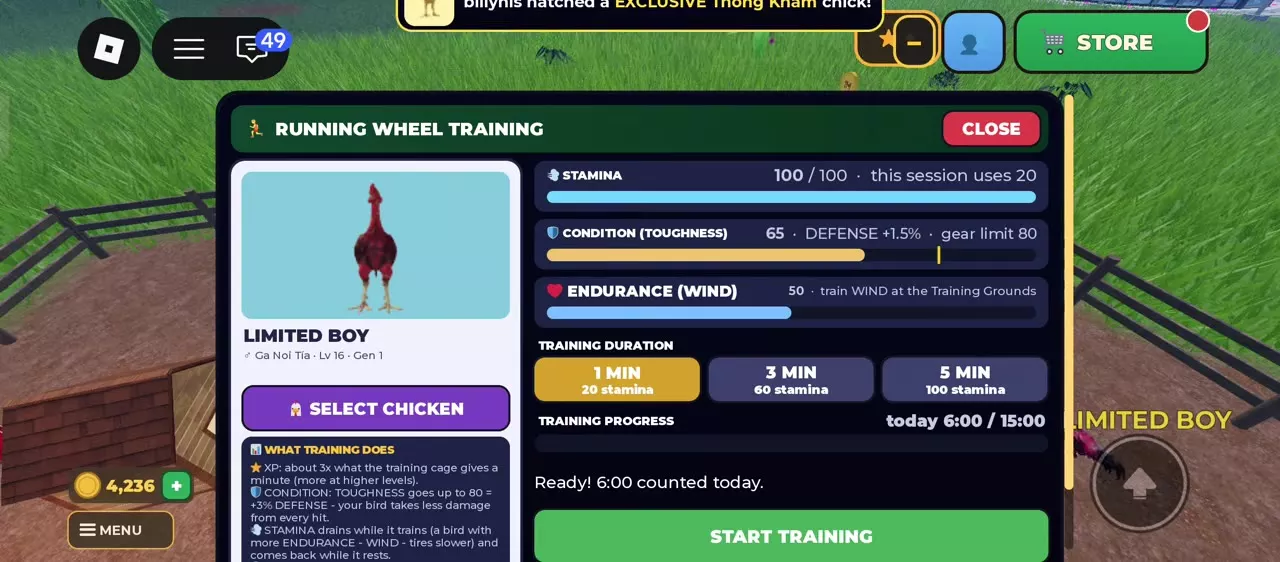
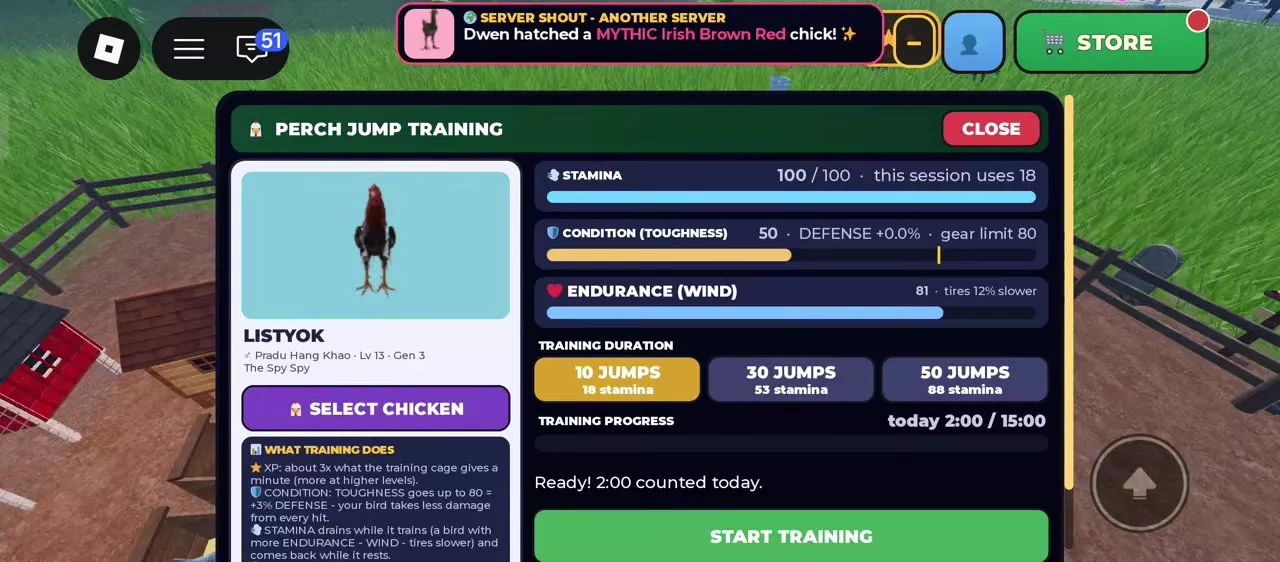
Both facilities raise TOUGHNESS to 80, corresponding to +3% DEFENSE. They award approximately three times the Training Cage's XP per minute, with more XP at higher levels.
- Running Wheel: choose 1 MIN, 3 MIN or 5 MIN. In a WIND 50 setup, these options cost 20, 60 and 100 stamina respectively.
- Perch Jump Bar: choose 10 JUMPS, 30 JUMPS or 50 JUMPS. For LISTYOK at Level 13 with WIND 81 and 12% slower fatigue, the options cost 18, 53 and 88 stamina respectively.
Each equipment panel displays daily progress against a 15-minute meter. Read the meter on the facility you are using before choosing another session.
Sparring Dummy
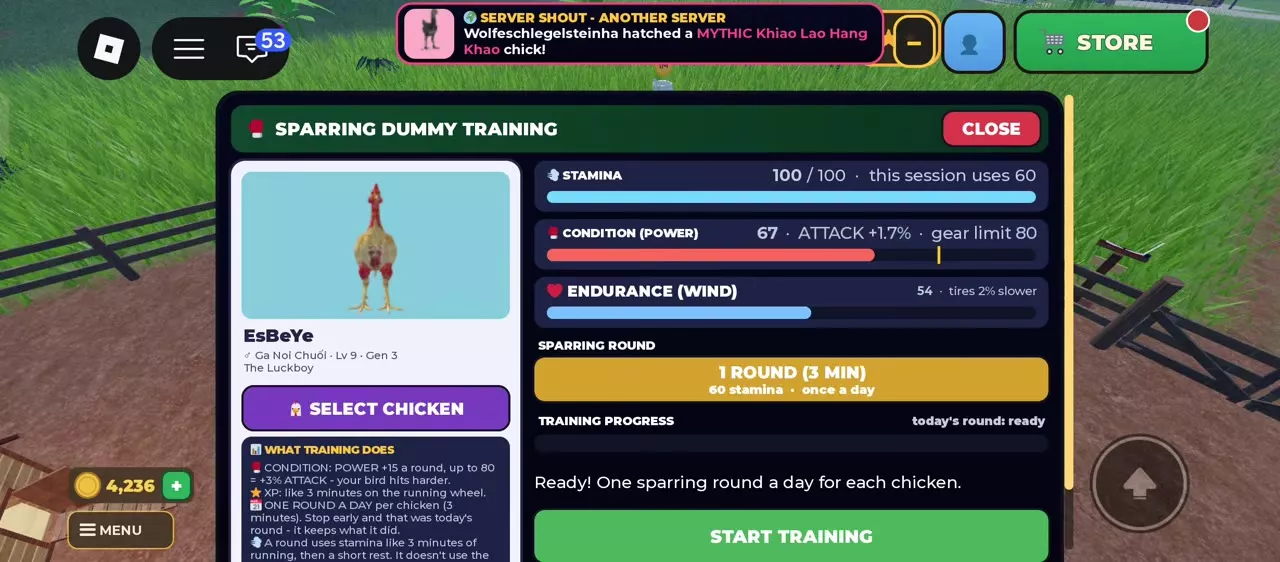
Each chicken gets one three-minute round per day. A full round adds 15 POWER, capped at 80, and awards XP equivalent to three minutes on the Running Wheel. POWER 80 gives +3% ATTACK.
Check that today's round is ready before starting. Stopping early still uses the day's round, while retaining progress already earned. A short rest follows the session.
WIND affects the stamina budget: LISTYOK at Level 13 with WIND 81 displayed 12% slower fatigue and a 53-stamina round. EsBeYe at Level 9 with WIND 54 displayed 2% slower fatigue and a 60-stamina round. Choose the session using the cost shown for the selected bird.
Read XP and conditioning separately
A 50-jump session for LISTYOK awarded 877 XP, raised TOUGHNESS from 50 to 65 for +1.5% DEFENSE, and reached Level 15. A separate rooster's 50-jump result awarded 421 XP, made the same TOUGHNESS increase, and reached Level 8. The conditioning gain matched, while the XP awards differed between these setups.
For XP activity choices and supply problems that interrupt leveling, follow Level Up Chickens and Restore Missing XP.
Daily energy and drill scores
Each bird has five daily drills, and its energy returns each night. Check the energy dots in the bird-selection menu before starting.
| Overall grade | Standard points |
|---|---|
| PERFECT | 9 |
| GREAT | 6 |
| GOOD | 4 |
| KEEP AT IT | 1 |
A temperament suited to the training makes the bird gain points faster. Applicable bonuses change the gain from these standard values, so read DRILL RESULTS for the actual increase, current combat bonuses and remaining energy.
When energy runs out, another drill that day carries a 12% Sore Leg risk. Stop and let the bird rest for the night. Fight Camp does not remove this risk.
Farm equipment uses stamina and its own session limits. Read its stamina bar separately from the energy dots used for Training Grounds drills.
Equipment, feed and injury treatment
- Equipment: use the training stations, farm equipment and camps directory to compare targets, session options and conditioning ceilings.
- Conditioning upkeep: Conditioner Mash costs 350 coins and halves training-bar decay toward 50 for three days. Choose it to preserve conditioning between training sessions.
- Drill gains: Prime Grain costs 500 coins and gives 30% more points for the next five drills. Use it when you are ready to complete those drills. See Chicken Feed and Storage for feed choices and purchasing.
- Sore Leg: open INSPECT > HEALTH and give the required Leg Bandage. It costs 300 coins at Vang's. Follow Chicken Health and Medicine for purchasing and treatment controls.